Tangerine Tamara Shirt: free pattern included
Posted: April 1, 2011 Filed under: Sewing Pattern: tops | Tags: 70's, batwing, Buttonhole, Collar (clothing), dropped, Fashion, pattern, recycling, Seam types, sewing, Sheer fabric, sleeve, top 13 CommentsTangerine “Tamara” Top: free pattern included

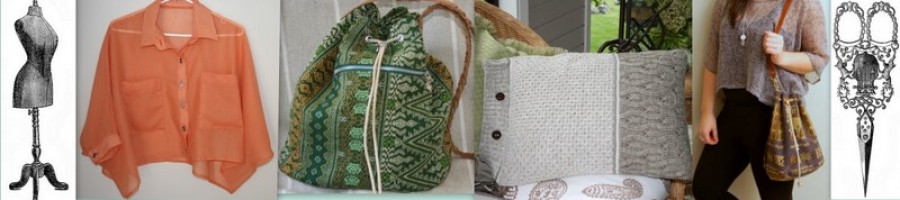
A sheer, loose fitting blouse, cropped length, batwing sleeve with collar, pocket detail, front button tab & cuffs.

Recently, a young friend with her finger on the pulse of fashion shared her love for the bright new colours and designs for Spring. Check out Tamara’s great blog, “Ad Idem”,which she co-authors with her best friend , Natalie. The new designs have a great 70’s vibe – my heyday!
Totally serendipitously I came across a gorgeous piece of soft, sheer cotton fabric in her favourite colour – tangerine. It just had such a lovely weight and draped beautifully – I knew immediately what I wanted to make with it!
So, ta da …the “Tamara” top!

I drew inspiration from these lovely designs :

Unfortunately, I did not think to take photographs of the sewing process for a tutorial, but did draft a pattern which I am very happy to share with anyone who would like to try their hand at it. You can click on this link here (Tamara Batwing cropped), or select the “Tamara “ top from the Box on the right. The pattern is in letter size parts. Print it off and match the pieces together by matching the coloured symbols.

I will make another top soon, and post “how to” tutorials shortly (collar, front button tab, cuffs, patch pockets, French seams). The top requires about 50 inches of sheer fabric, so look out for remnants in your fav fabric or Thrift store! A fabric with a good drape/weight is essential – don’t try this in a stiff sheer fabric. Unless you are already an expert seamstress, avoid chiffon – it is a nightmare to sew.
I have also been looking at the extra-large size clothing racks in Thrift Stores, and have seen lots of sheer dresses and blouses that can be recycled instead of using fabric. I will post my “recycling” projects soon.
The fit is very loose and drapey, so the width and length can be adjusted as desired. The design will be wonderfully cool for Summer, worn over a tank, bandeau , bustier or bikini top. The pattern size is a 12, but will fit any size from 6 -16! The length is about 19 ½ inches long. It can be allowed to slip back, making the front shorter, and the back asymmetrically longer. It looks really cute when the front hem just skims the navel. The length of the sleeve (including the cuff) is also about 19 inches. You will need at least 7 buttons (I got mine off of an ugly $1 shirt but the sewing section of thrift store often have baggies of buttons).
One thing I would change if I were to make this top in a sheer fabric again, is to sew it so that the white iron-on-interfacing doesn’t show. (you can see it shadowing through) I added an extra fold to the front button tab so that the interfacing is hidden. I’d also cut 3 collars and cuffs and double up the fabric where the interfacing shows towards the outside.
Method:
- Cut out fabric. The first page of the pattern shows how to lay out the pattern pieces on the fabric.
- Iron the interfacing on to the front button tab, collar and cuffs.
- Sew the front button tabs
- Sew on the patch pockets (Just realized I forgot to include a pattern for them…darn!) They are about a 17cm x 19cm rectangle – adjust the size and position as desired (Pattern piece Front #7 would work!)

- Sew the collar. I have included a sewing guide for the collar that you can print out, glue to cardstock, and trace around with tailor’s chalk or seamstress’ pen.
- Sew shoulder seams (I suggest using a French seam method for neatness)
- -Stay-stitch the neckline
- Attach collar to neckline
- Gather the lower edge of the sleeves (where the cuffs will be attached)
- Sew the cuffs.
- Sew the underarm seams (French seam again).
- Attach the cuffs to the sleeves
- Sew the button holes on cuffs, collar, and front button tab
- Finish the lower hem
- Sew on the buttons

And…you’re done! If you try the pattern, please send me feedback, and suggestions for improvement.
Tutorials coming soon – promise!
Enjoy,
Pippa
Anne blouse pattern: sheer loose fitting, with batwing sleeve
Posted: March 23, 2011 Filed under: Sewing Pattern: tops | Tags: Arts, batwing, blouse, Craft, cropped, DIY, easy, free, garment, inexpensive, pattern, Patterns, recycle, repurposed, Seam types, sewing, sheer, Sheer fabric, sleeveless, South Africa, Spring, Textile, top, upcycle 7 Comments
I love these loose-fitting, draped blouses as throw-overs for summer. The right hand one comes from one of my fav sites (Burda) offers free patterns.

They are such fun, and quickly give an updated look when popped over a tank and leggings. These are some pictures from various websites that I took inspiration from for a cropped batwing sleeve pattern I have called “Anne” after an old friend who was slightly “batty” (love her quirkiness)!

Here is my version, modeled by my favorite “tester” , who gets to try out my patterns and offer constructive comments. It is apparently versatile and comfy to wear. Download the pattern from the “Box” widget in the right hand side bar.

"Anne" loose batwing top
It is super easy to make. I purchased 60 centimeters (or 0.6 m) of sheer fabric for this project – a lovely chiffon which has a lovely drape. It was a very wide fabric, so you may need more if your fabric is narrower.
I think any lightweight, sheer fabric that has a nice drape would be good for this. Chiffon is quite pricey ($15 per meter) but you could also try making it from a remnant, a fine old table cloth or sheer / lacy curtain. After I made this (dang), I saw a beautiful size XXXL chiffon dress ($5) in the TS *recently that would have probably made 2 of these. The large size clothing and night wear racks are always “happy hunting grounds” for fabric. *(I’m going to say “Thrift Store” so often I may as well start abbreviating it!)
The neck opening is quite scooped so it does end up quite large – don’t enlarge it or it may fall off the shoulder! Meryl likes the scooped neck, because if she wants to, she can pull it down at the back, making the front extra cropped showing some midriff. The neckline then fits at the neck base, with the back draped asymmetrically. She also pulls it to one side sometimes, exposing one shoulder.
I used a serger (overlocker in South Africa) for the seams, but if you have a regular machine, try doing a french seam when sewing these very fine sheer fabrics. (Instructions here or http://www.sewneau.com/how.to/french.seam.html
Here is the free pattern if you’d like to try it. Anne top Pattern or Download the pattern from the “Box” widget in the right hand side bar.–>
Print it off and join the pieces together , matching the symbols. Both pattern pieces are placed on the fold along their center line.
I didn’t take any photos of the sewing process, so I cannot post “How to” pics, but if you would like me to, please leave a comment.
Method:
It only has 2 seams (shoulder and underarm), and the arm and waist edges are just hemmed with a narrow hem. If you have a roll-hemmer setting on your serger , you could use that to finish the edges instead – it depends what look you like.
1. Sew ONE shoulder seam together. This fabric was VERY slippery to sew, so I actually “cheated” a bit, and did not cut the shoulder seam for this particular top, but just put the pattern on the fold of the fabric. I folded the fabric in half , then half again, and basically cut a hole for the neck. The shape of the garment would be better with a shaped shoulder seam though.
2. Bind the neck opening (**remember it’s always easier to work flat than once the other shoulder seam is sewn) I just serged the edge of the neckline and turned it under, and sewed it down (since this was just a “test”), but I think it would look better bound with bias binding in the same fabric. (see earlier “Meryl” top for Bias Binding Tutorial)
3. Sew the other shoulder seam together.
3. Sew the arm hems. Ditto for comment above**. You could also thread elastic or a cord / ribbon through the arm hem if you want it to gather up slightly, but if you decide to do that, sew the underarm seams first so the armhole is a continuous loop.
4. Sew the underarm seams. Hem the lower edge with a narrow hem. Alternately you could add on another 2 inches in the length and make the hem much wider.
Press all seams down so the lie flat….and you’re done!
I hope you like it. In my next post I will show you another version with a collar that I made for a friend Tammy.
Keep well,
Pippa
